Table of Contents

Replacing the Thermal Paste on Your Laptop
The thermal paste on your laptop’s CPU plays an important role in transferring heat away from the processor and towards the heat sink. Over time, the thermal paste can dry out or become less effective, which can lead to higher CPU temperatures and potential damage to your laptop.

To replace the thermal paste on your laptop, you’ll need to follow these steps:
- Power down your laptop and unplug it from the wall.
- Remove the battery and any external components like the hard drive or memory modules.
- Locate the heatsink/fan assembly on your laptop’s motherboard. This should be near the CPU.
- Use a screwdriver to remove the screws holding the heatsink/fan assembly in place.
- Gently remove the heatsink/fan assembly from the motherboard, taking care not to damage any of the components.
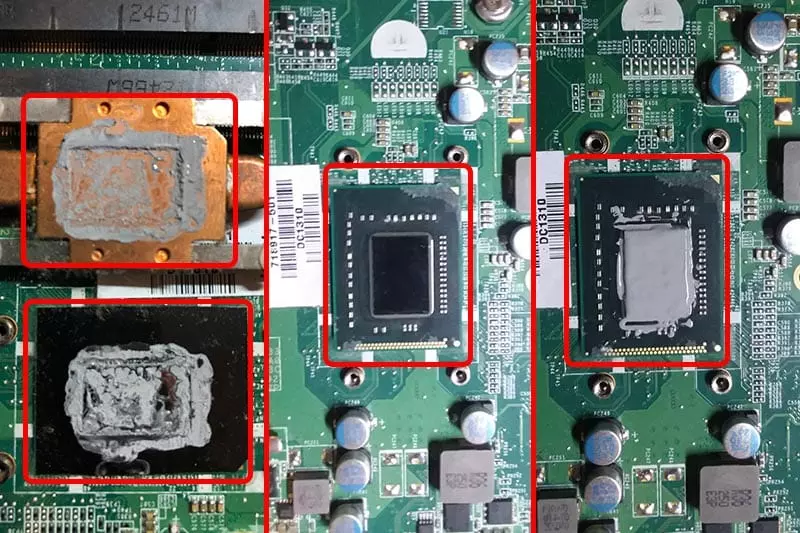
- Use rubbing alcohol and a lint-free cloth to clean the old thermal paste from the surface of the CPU and the heatsink.
- Apply a small amount of new thermal paste to the center of the CPU. The amount you need will depend on the size of your CPU and the type of thermal paste you’re using.
- Reinstall the heatsink/fan assembly onto the motherboard, making sure that it’s secured tightly in place.
- Reinstall the battery and any external components, and then power on your laptop to make sure that everything is working properly.

How to Change the Thermal Paste on a Desktop Computer
Changing the thermal paste on a desktop computer is similar to changing it on a laptop, but there are a few additional steps to keep in mind.

- Power down your desktop computer and unplug it from the wall.
- Remove the side panel from your computer case to access the CPU and heatsink/fan assembly.
- Use a screwdriver to remove the screws holding the heatsink/fan assembly in place.
- Gently remove the heatsink/fan assembly from the motherboard, taking care not to damage any of the components.
- Use rubbing alcohol and a lint-free cloth to clean the old thermal paste from the surface of the CPU and the heatsink.
- Apply a small amount of new thermal paste to the center of the CPU. The amount you need will depend on the size of your CPU and the type of thermal paste you’re using.
- Reinstall the heatsink/fan assembly onto the motherboard, making sure that it’s secured tightly in place.
- Reattach the side panel to your computer case, and then plug your desktop computer back into the wall.
- Power on your computer to make sure that everything is working properly.

How to Properly Apply Thermal Paste to the CPU
Properly applying thermal paste to the CPU is essential to ensure that it effectively transfers heat away from the processor. Here are the steps to follow:
- Clean the surface of the CPU and heatsink/fan assembly with rubbing alcohol and a lint-free cloth.
- Apply a small amount of thermal paste to the center of the CPU. The amount you need will depend on the size of your CPU and the type of thermal paste you’re using.
- Use a plastic card or similar tool to spread the thermal paste evenly across the surface of the CPU. Be careful not to use too much pressure, as this can damage the CPU.
- Reinstall the heatsink/fan assembly onto the motherboard, making sure that it’s secured tightly in place.
- Power on your computer to make sure that everything is working properly.
By following these steps, you can ensure that your CPU is properly cooled and protected from potential damage due to overheating.
Some additional tips for applying thermal paste to the CPU:
- Make sure to use a high-quality thermal paste that is designed for use with CPUs. Avoid using generic or low-quality thermal pastes, as they may not provide adequate heat transfer.
- Apply only a small amount of thermal paste to the CPU. Too much paste can actually reduce the effectiveness of the heat transfer, as it can create air pockets or cause the paste to ooze out onto other components.
- Be sure to spread the thermal paste evenly across the surface of the CPU. This will help ensure that heat is transferred evenly across the processor, rather than being concentrated in one area.
- If you’re using a large CPU cooler, you may need to apply a bit more thermal paste than if you’re using a smaller cooler. However, always err on the side of using too little rather than too much.
- When reinstalling the heatsink/fan assembly, make sure that it is secured tightly in place. A loose or wobbly cooler can reduce the effectiveness of the thermal paste and lead to higher CPU temperatures.
- Finally, it’s a good idea to periodically check the temperature of your CPU using monitoring software. This will help you detect any potential problems with overheating and allow you to take action before damage occurs.
By following these tips and best practices, you can ensure that your CPU is properly cooled and protected from damage due to overheating. Regularly replacing the thermal paste on your CPU can help prolong the life of your computer and ensure that it runs smoothly and efficiently.